This is the first of a 3 part series on building a local multiplayer arena game in Unity using Physics2D and Cinemachine. The first part will walk through creating the core mechanics of the game, including creating pirate ships, shooting cannons, and destroying ships. The second part will cover creating the core game loop, and the third will add User Interface elements and audio.
Once I have posted all three of the tutorial parts, I will record and put up a video illustrating the tutorial step by step on Youtube!
This tutorial assumes basic knowledge of using the Unity editor – you need to know how to import assets, create a scene, and should be familiar with the absolute basics. If you don’t have Unity installed, check out this video for a quick tutorial to get started.
The tutorial uses free resources from the following:
- Kenney’s Pirate Pack, Explosion Pack from Kenney.nl
- The Wilhelm Scream from FreeSound
- The Blackmoor Tides loop fromMatthew Pablo via OpenGameArt
- The Cannon Sound Effect from Alexander via Orange Free Sounds
I recommend supporting the artists that are doing awesome work creating music and art for us to use in your games (or else this would all have been done with in mspaint and sound recorder!). You can download the bundled assets here.
Finally, if you need a copy of the completed code (for example, if you weren’t able to complete one of the steps, or ran into any issues), you can download the completed code for part one of the project here.
So lets get to it!
1. Set up your project
- Open Unity and start a new 2D project.
- Unzip and copy the assets into your project. If you aren’t familiar with this, take a moment to watch the Unity user interface tutorial above – it will greatly help your understanding of the tutorial!
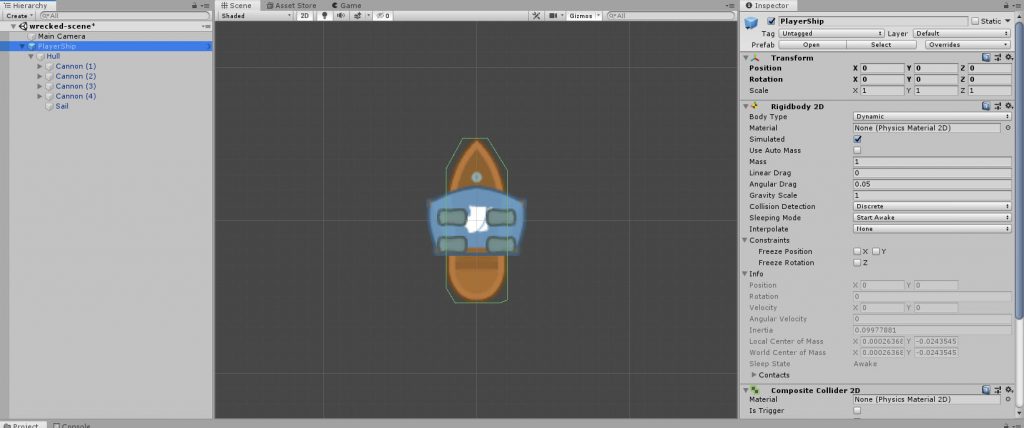
2. Create a player ship
The first step is to create a ship that we can sail around and shoot cannonballs, and to do that we need to start with a fresh scene. We are going to start with creating a ship with different components,
- Create a new scene, and save it (I called mine “DevelopmentScene”)
- Create a new game object
- Reset the Transform component
- Rename it to “PlayerShip”
- Drag hullSmall (1) from Ship Parts onto the game object
- Rename it to “Hull”
- Reset the Transform component
- Add a PolygonCollider component
- Check “Used by Composite” (ignore the error message that pops up, it will go away in step 5!)
- Drag sailLarge(12) from Ship Parts onto the Hull game object
- Rename it to “Sail”
- Select the “PlayerShip” Object
- Add a RigidBody2D component
- Add a CompositeCollider2D
- Change the Geometry type to “Polygons”
- Add a New Script called “ShipController”
A couple of notes about what we have done here – we have created two separate sprites that are children of a GameObject, added a couple of colliders to make sure that we have collision detection in the game engine, and added a RigidBody2D component to enable 2D physics for the game object. Just this step has unlocked a significant amount of functionality, including the ability to easily change the sprites for the hull and sails (important for showing damage to the hull, and for swapping the sails for the correct color for each player).

At this point we are ready to start writing some code! Open up the ShipController script, and lets get started!
a) Basics of the Ship Controller
The ship will use Physics2D, and we will move the ship around by adjusting the Rigidbody2D component. At the top of the class definition, and add the following code:
     // Cached Rigidbody2D reference
     Rigidbody2D rb;
     [Header("Input")]
     // Input Map
     public string HorizontalInput = "Horizontal";
     public string VerticalInput = "Vertical";
     public string FireCannonsButton = "Fire1";
     public bool ControlsEnabled = true;
     [Header("Movement")]
     // Movement Variables
     public float shipSpeed = 8;
     public float shipTurnSpeed = 180;
     float movement;
     float turn;
Find the “Start” medthod, and change it so that it has the following code in it:
     void Start()
     {
         rb = GetComponent<Rigidbody2D>();
     }
This will look up the Rigidbody2D component we added in section 5.a above, and make it available to the script. The next step is to implement controls – go down to the “Update” method, and add a new method with the following code below:
     private void FixedUpdate()
     {
         if (ControlsEnabled)
         {
             movement = Input.GetAxis(VerticalInput);
             turn = Input.GetAxis(HorizontalInput);
         }
         else
         {
             movement = 0f;
             turn = 0f;
         }
         Vector3 delta = movement * shipSpeed * transform.up * Time.fixedDeltaTime;
         rb.MovePosition(rb.position + (Vector2)delta);
         rb.MoveRotation(rb.rotation + turn * shipTurnSpeed * Time.fixedDeltaTime * -1);
     }
Note that we have two methods with the name Update in them – the Update() method, and the FixedUpdate() method – these are named because they are called at different times. There is a great explanation of what the difference between the two are, but for our purposes it’s enough to know that since we are using the Physics system, we want to place our physics related code in the FixedUpdate(). If you want to know more, you can head over to the Unity Learning site to watch this video about it!
In the code above we first check to see if controls are enabled – if they are, we retrieve the vertical axis for forward movement, and the horizontal axis input for ship rotation – in this case we are using the Unity default controls, so the left stick on a Direct3D controller, or WASD, or the Arrows on a keyboard. If the controls aren’t enabled, we simply set the movement and turn values to 0, which will negate any movement. Then we calculate how much the ship has moved by taking the movement input and multiplying it by our ship speed, and then multiplying it into a matrix for 2D movement we use transform.up, which is a Vector2 that specifies (0,1), or movement in the Y axis. We then multiply this by the Time.fixedDeltaTime value so that we slice up ship movement so we don’t try to move the whole ship speed in a single physics update. Finally we use the Rigidbody2D object that we got earlier to update the position by adding the delta to the current position.
The next line does a similar thing for ship rotation by taking the turn input, multiplying it by the turn speed, and multiplying that by the fixed time interval, again to tie ship rotation to the physics update – note that we multiply the rotation by -1, this just reverses the direction of the rotation, and makes sense for our control scheme. We then use the MoveRotation method to rotate the ship by the turn amount.
There is an important point here – because we are using Rigidbody2D and leveraging the Unity Physics2D system, we shouldn’t just move the game object by updating it’s transform, that is why we are using the MoveRotation and MovePosition methods – these update the physics model.
At this point, save your script, and save your scene. Press the “Play” button, and move your ship around! If something doesn’t work, review each of the sections of code to make sure you entered them correctly, and take a look at the completed code from the zip at the top of this page. Finally, if you get really stuck, post a question here, or on the EastVanGameJam web page!
Great! One odd thing – the ship slowly drifts down to the bottom of the screen! That’s because we haven’t configured the Physics engine yet! Each Unity Project has a wide range of settings, and in this tutorial we will configure both Physics, and Input. Go to the “Edit” menu and select “Project Settings”, then click on “Physics 2D” – you will see a bunch of physics options that can be tweaked – the Unity documentation covers each one, but we are only concerned with the Gravity option – we want to change the Y value to “0”. This is a top down game, and we don’t need gravity for that.
Click play again, and you should see that the ship isn’t drifting anymore!
Create a new folder in the project pane called Prefabs, then drag the “PlayerShip” object to the prefabs folder to create a prefab. Prefabs are objects that can be easily instantiated from code, duplicated, configured, etc. The Unity manual on prefabs has more information, including the new prefab editing mode, so as usual you can find more information on the Unity site! Save your scene, and project.
b) Create a cannon ball!
Lets create a cannon ball! But before we do, one quick note… you will things like “In the Transform object, Set the position to {0, 3, 0} – if you see that it relates to a field in Unity that takes multiple values. In this case you would look for the Transform object in the Inspector, and see the row that says position, and enter the values in the order provided there.

- First, move the player ship so that we can make our cannon ball hit something!
- Select the Playership object and edit the Transform Object
- Set the position to { 0, 3, 0 }
- Set the Rotation to { 0, 0, 90 }
- Select the Playership object and edit the Transform Object
- Optional Step: Select the “Main Camera” object – make the background a neutral color to make things more visible; the rest of the tutorial will assume you did this, but if you don’t need to do this to see the cannonball clearly, it won’t affect anything!
- Click the Background color (probably a Dark blue, depending on your defaults), and change the R, G, B values to 250
- In the Ship Parts folder, find the “cannonball” asset, and drag it into the hierarchy.
- Rename the object to “Cannonball”
- Reset the transform.
- Add a Rigidbody2D
- Add a CircleCollider2D
- Add a new script called “CannonballController”
Now we are ready to write the CannonballController code! There are a few simple things we want to accomplish – first, we want the cannonball to travel at a certain speed, and the cannonball to disappear after a certain distance. Because this game is using physics, we will use the Rigidbody2D again.
Open the Cannonball controller script, and add the following code at the top of the class:
    public float speed = 10f;
    public float range = 1f;
    Rigidbody2D rb;
Delete the “Update” method, and update the class to include the following code:
void Start()
    {
        rb = GetComponent<Rigidbody2D>();
        Destroy(gameObject, Range);
    }

    // Update is called once per frame
    void FixedUpdate()
    {
        Vector3 delta = transform.up * Speed * Time.fixedDeltaTime;
        rb.MovePosition(rb.position + (Vector2) delta);
    }
The code in the start method does two things, again, it gets access to the Rigidbody2D component to update physics, and second, it schedules the destruction of the game object. The Destroy() function allows you to clean up a gameobject, and also allows you to pass a time parameter. If we were going to be fancy, we could actually calculate the range of the cannonball, but for simplicity we will simply say that the cannonball will fly for Range seconds, then be destroyed. The FixedUpdate function works much the same as the ship controller, but doesn’t take any input. Save your scene, and press play, and you should see your cannonball fly and knock the ship offscreen! Keep an eye on the hierarchy pane – you will see the cannonball vanish after a second.
This code also contains one of our first game balance decisions – ships have a movement of 8, and cannonballs have a movement of 10 – that means that ships can’t outrun cannons, but that might not actually be the value we use in the end. By configuring them as variables we can adjust these things through the development lifecyle and see how the game plays.
Lets jump back into the code, and add support for hitting things… underneath the FixedUpdate method, add the following code:
void OnCollisionEnter2D(Collision2D collision)
    {
        Destroy(gameObject);
    }
At some point we will want to add sound, and explosion graphics. We will also want to make the ship take damage, but first we need to get the ship firing.
Select the Cannonball object in the hierarchy and drag it into the prefabs folder. Once that is done, delete the cannonball prefab, and the player ship from the scene.
c) Adding Cannons
The next step is to add Cannons to the ship. One cannon isn’t enough for a ship – lets go with four!
Double click on the prefab called “PlayerShip”, this will open it up in the Prefab Mode, which is a sort of sub-scene in Unity. We are going to add Cannons to the ship, which will take several steps.
- Select the “Sail” object in the hierarchy
- Uncheck the box by the name in the Inspector – this will disable it, and get it out of the way for the next steps.
- Go back to our “Ship Parts” folder” and find the “cannonLoose” sprite. Drag that onto the Hull object and set the transform values to the numbers below.
- Rename the object to “Cannon (1)”
- Set the Position to { -0.16, 0.02, 0}
- Set the Rotation to { 0, 0, 180 }
- Right click on Cannon (1), and select “Create Empty” and rename it to “Port”
- Drag the “Cannonball” prefab onto the “Port” game object.
- Now select the Port object again, and using the mouse, grab the little red arrow in the editor, and drag it out til the cannon ball is good distance away from the cannon.
- If you don’t know what a good distance is, set the Port transform to {0.16, 0, 0}
- Delete the Cannonball prefab from the Port object in the hierarchy
- Highlight Cannon (1) in the hierarchy then select the “Edit” menu, then “Duplicate” three times. You should now have four Cannons.
- Select each of the cannons in order, and set them up as below:
- Cannon (2): Position to {0.16, -0.02, 0}, Rotation {0, 0, 0}
- Cannon (3): Position to {-0.16, 0.16, 0}, Rotation {0,0,180}
- Cannon (4): Position to {0.16, 0.16, 0}, Rotation {0,0,0}
- Re-enable the Sail object by clicking it, then checking the box by it’s name.
Oh no! that doesn’t look good at all! The cannons can be seen over the sail! Lets set some sprite sorting orders.
- Click on the Hull, and find the SpriteRenderer in the inspector, and set the Order in Layer to 1.
- Click on each of the Cannons (you can select them all at once, or do them one at a time). Set the Order in Layer to 2.
- Click on the Sail and set the Order in Layer to 3
In the Scene pane, click on “Scenes” beside “PlayerShip” and you will be returned to your scene. Drag the PlayerShip prefab back into the hierarchy, reset it’s transform and save your scene.
Now that we have added Cannons, we need to make them shoot! So lets take a moment and make some game balance decisions – do we want to allow Auto-fire? How fast do we want to let the player shoot their cannons? I am going to say no to autofire, I want the players to do more than just steer around blasting away, and lets say it takes the crew two seconds to reload.
Lets pop open the ShipController script again and add some code.
First, find the Header(“Movement”) line and add the following code beneath that section:
    // Simple Fire Control System
    [Header("Fire Control")]
    // when the last time the ship fired
    float NextFire;
    public float FireDelay = 2f;
    public Transform CannonballPrefab;
    public Transform[] GunPorts;
The NextFire is used to determine when the next time the ship can fire is, and FireDelay is the amount of time the player has to wait to fire again after firing their cannons. The CannonballPrefab variable will provide a reference to the Cannonballs we will shoot, and the Gunports array will track where the cannonballs come from.
Second, go down below the FixedUpdate method, and add the following code:
void FireCannons()
    {
        if (Time.time > NextFire)
        {
            foreach (Transform port in GunPorts)
            {
                Instantiate(CannonballPrefab, port.position, port.rotation, null);

            }
            NextFire = Time.time + FireDelay;
        }
    }
This code does a couple of really useful things: it checks to see if the current time is greater than the time allowed to fire – if the player hasn’t fired yet, NextFire will be 0, so it will always be later. If the time is greater, then it runs through the array of gunport Transforms that we declared and creates a Cannonball at each location using the Instantiate() method. Then, we update NextFire to be FireDelay seconds in the future.
Now that we have a way to fire our Cannons, we need to actually call that. Lets go back up to the FixedUpdate() function, and find the If (ControlsEnabled) block. Update it so that it looks like this ( you only need to add the highlighted lines, don’t change anything else!):
      if (ControlsEnabled)
        {
            movement = Input.GetAxis(VerticalInput);
            turn = Input.GetAxis(HorizontalInput);

            if (Input.GetButtonDown(FireCannonsButton))
            {
                FireCannons();
            }
        }
Save your script, and switch back to the Scene. Double click the “PlayerShip” prefab to enter prefab mode, and make the following changes:
- Look at the ShipController component in the inspector.
- Set the FireDelay to 2 (it should be this already)
- Drag the “Cannonball” from the Prefab folder onto the CannonballPrefab field
- Expand Gunports
- Set size to 4
- One at a time, select the Port object from each Cannon and drag it to the Element slot that was created under GunPorts.
Save your scene. Press play, and then sail your ship around and press the Fire1 button (Left Control, Right mouse button, or the joystick button).
Don’t forget to save your scene. Make it a habit – it will save sadness and tears and googling how to attach a debugger to Unity to step in and break out of looks after you realize you hadn’t saved your scene after hours of work. Trust me, it’s good habit to get into 😀
d) Another Player Has Entered the Game!
Now we need to add another ship to shoot at! This is where we will learn the power of prefabs…
- Select the “PlayerShip” object in the scene
hierarchy
- Rename the ship in your scene to “Player1Ship”.
- In the ShipController change HorizontalInput to Horizontal1
- In the ShipController change VerticalInput to Vertical1
- Change the Transform position to { 4, 4, 0 }
- Change the Transform rotataion to {0, 0, 45}
- Drag a copy of the PlayerShip prefab into the scene
- Rename the ship in your scene to “Player2Ship”.
- In the ShipController change HorizontalInput to Horizontal2
- In the ShipController change VerticalInput to Vertical2
- Change the Transform position to { -4,- 4, 0 }
- Change the Transform rotataion to {0, 0, 45}
- Expand the object in the Scene Hierarchy so that you can find the Sail object, and click the circle select icon by the Sprite entry in the SpriteRenderer component, and select a different color sail — I used sailLarge (10).
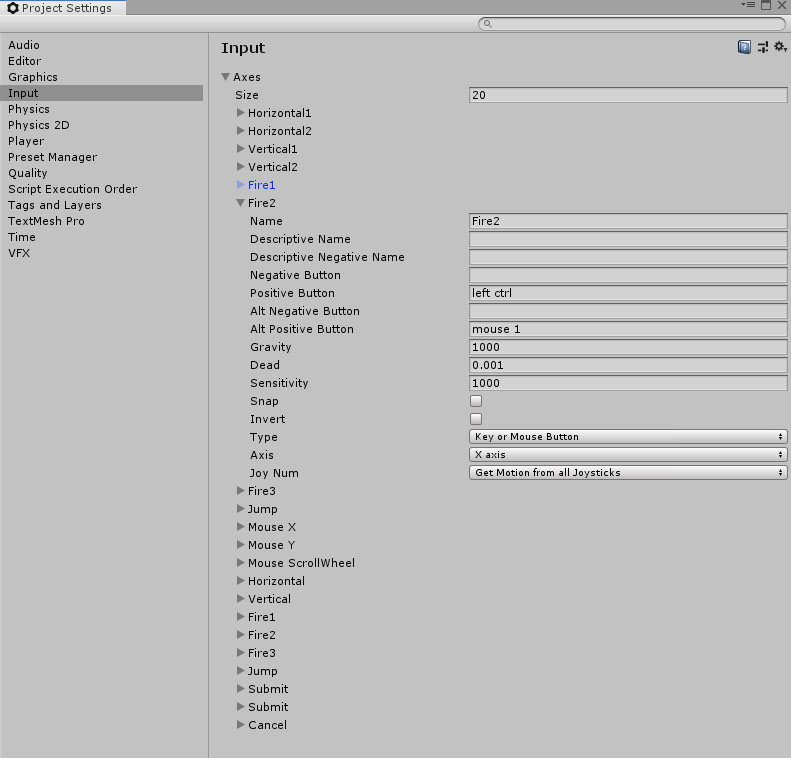
Now we need to configure up the Input for the game. Go into Edit, then Project Settings, then select the Input line in the left pane. This is the input configuration for Unity. If it’s not expanded, click on the triangle besides Axes to expand it.
- Right click on Horizontal and select “Duplicate Array Element”
- Select the top Horizontal
- Rename it to “Horizontal1”
- Delete “a” from Alt Negative Button
- Delete “d” from Alt Positive Button
- Click the little triangle to hide “Horizontal1”’s properties.
- Expand the next Horizontal
- Rename it to “Horizontal2”
- Replace “left” with “a” from Negative Button
- Replace “right” with “d” from Positive Button
- Delete “a” from Alt Negative Button
- Delete “d” from Alt Positive Button
- Click the little triangle to hide “Horizontal2”’s properties.
- Right click on Vertical and select “Duplicate Array Element”
- Select the top Vertical
- Rename it to “Vertical1”
- Delete “s” from Alt Negative Button
- Delete “w” from Alt Positive Button
- Click the little triangle to hide “Vertical1”’s properties.
- Expand the next Vertical
- Rename it to “Vertical2”
- Replace “down” with “s” from Negative Button
- Replace “right” with “w” from Positive Button
- Delete “s” from Alt Negative Button
- Delete “w” from Alt Positive Button
- Click the little triangle to hide “Vertical2”’s properties.
- Expand Fire1
- Change Positive Button to “right ctrl”
- Expand Fire2
- Change Positive Button to “left ctrl”
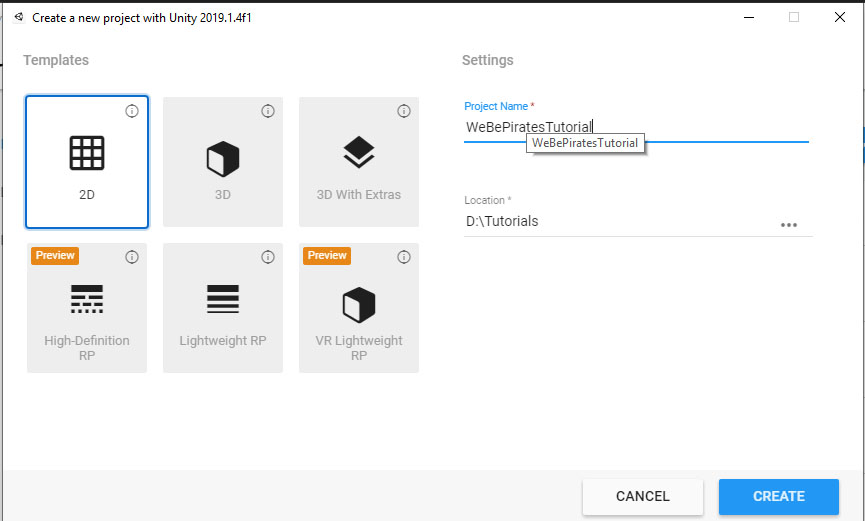
If this doesn’t work out for you, you can simply download this InputManager.asset file, and place it in the ProjectSettings directory for your Unity project. This will overwrite the settings with my copy of the file, and should get you working. If you don’t know where to find that, refer back to the path you set for your project when you created, in my example image at the beginning, I would put this file in D:\Tutorials\WeBePiratesTutorial\ProjectSettings
Close the Project Settings window, save your scene, and run your game. At this point, your WASD, and Left controls should work for one ship, and the Arrows and Right controls should work for the other ship.
Once you have the ships working properly, Drag each of the Player1Ship and Player2Ship objects into the prefab folder, and make sure you specify they are PrefabVariants. This allows them to remain rooted to the PlayerShip prefab.
The next step is to get the ships taking damage when they get hit!
e) Dealing Damage
In the game we want the ships be able to take a number of hits before they are destroyed – so lets give each ship a pool of hitpoints. Back to the game balance — I think it’s fair to say that each ship needs to be hit by 10 cannonballs to be destroyed. So lets say 100 hit points, and 10 damage. In reality, that is only 5 shots if a skilled player can score a hit with two cannons at the same time.
Lets start by making Cannonballs have a property that says how much damage they do. Click on the Cannonball prefab (not double click). Then click Add Component to add a new Script called “DamageSource”. Then open the script in your editor.
Delete the Update and Start methods, and then edit the file so it looks like this:
public class DamageSource : MonoBehaviour
{
    public float DamageAmount = 10;
}
Save the script, and then open the ShipController script.
Under the Fire Control section, add the following code:
    [Header("Health System")]
    public float health = 100;
    bool isDead = false;
Then, lets add a function that we can call when we should take damage to make sure that we update Health, and check for all of the things related to taking damage.
void TakeDamage(float damage)
    {
        health = health - damage;
        if (health <= 0)
        {
            isDead = true;
        }
    }
Now we need to actually do something to make sure that when we are dead, the ship doesn’t stick around! After the TakeDamage method, lets add the following two functions.
    void Die()
    {
        // Do death stuff..
        Destroy(gameObject, 1f);
    }

    void Update()
    {
        if (isDead)
            Die();
    }
This does two things, one – it allows us to have a single place to add death related stuff – the Die function (we might want to play a sound, do an animation, etc), as well as destroying the ship. We also add the Update function, which is a regular, non-physics update that simply checks if our isDead variable is set, and if so, it invokes Die().
Now – press play, pick a ship, sail it over to your enemy and DESTROY THEM!
The End of Part One
This is the conclusion of the first part of the tutorial – in the next section we will build the game loops and start in on the user interface elements to support player selection, and part 3 will conclude with fleshing out the user interface and adding Audio.
If at any point you need to compare where you are with the actual source code for this portion of the tutorial, you can find the completed code for this section in the downloads at the top of this page! If you enjoyed working through this tutorial, consider participating in the EastVanGameJam on August 16th to 19th! Register for the GameJam here!