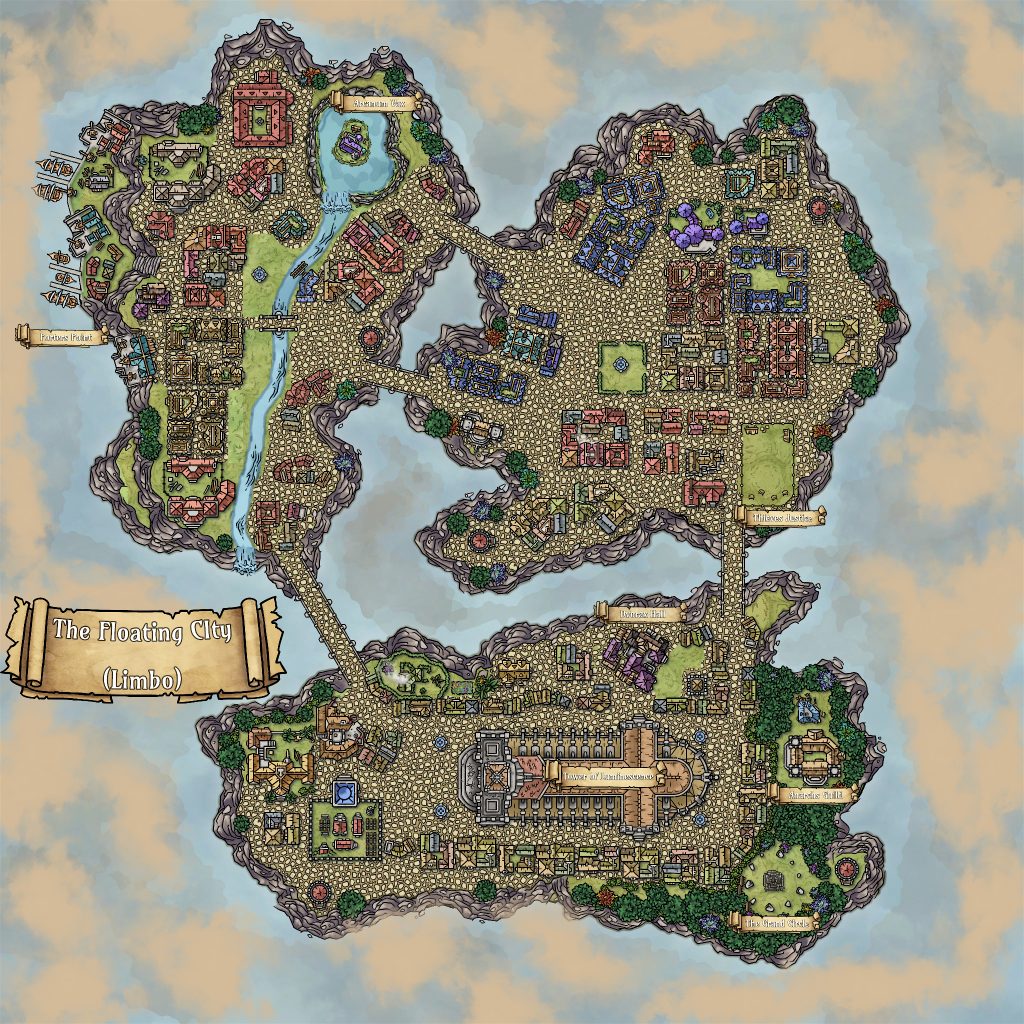
One of my players recommended Inkarnate for map design, so I got it, and took a crack at making my interpretation of The Floating City from Limbo (as described in Planes of Chaos
I should put a better tagline…
One of my players recommended Inkarnate for map design, so I got it, and took a crack at making my interpretation of The Floating City from Limbo (as described in Planes of Chaos
Hunter who tracks outside of time
Guardian lord of ancient rhyme
Brother stag in the musky glen
And consort of the Goddess in her woodland den
We call you forth as we make our way
Walking in your power every day
Guide us true in our hunt this night
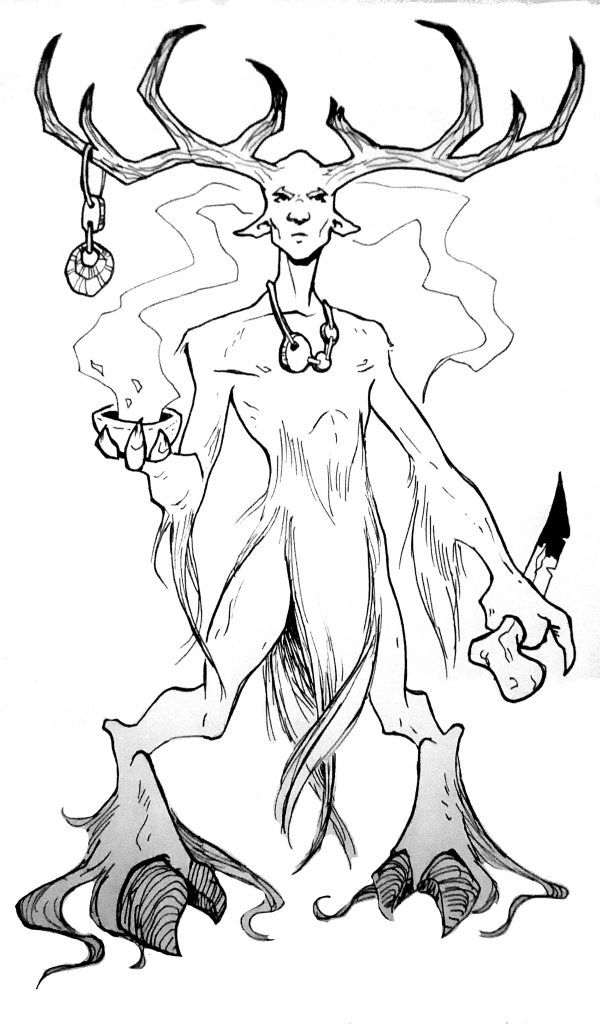
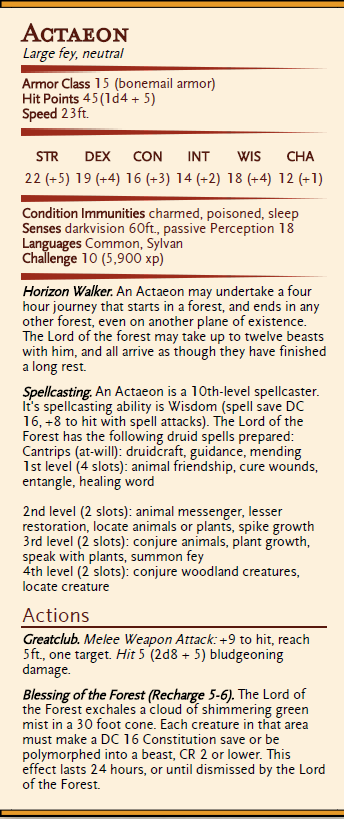
One of the many allies the party encountered during the Ways campaign was the Lord of the Forest – an Actaeon, who made it’s home in the Black Forest to the north east of Lunima. While this particular Actaeon was male, Actaeons can be male or female.
This creature is partially inspired by the original creatures from Mystara, but also by some lyrics from the song “Hymn to Herne” by S.J. Tucker, and performed by Alexander James Adams. As usual, you can find The Lord of the Forest on Homebrewery or download a PDF.
There are many who look to the forests as a wilderness to be explored, or to be hunted for food, or to be cut for resources, but there are many creatures that make the forest their home. Those who reside in the Black Forest look to the Lord of the Forest for protection.
The Lords of the Forest are fey creatures that trancend boundaries between the planes, and seek to protect and heal the forests the frequent. When they can, they prefer to avoid confrontation but if they aren’t afraid to fight.
Allies of Nature Often responding to the calls of those who would deal with threats to their forests, they can provide healing, guidance, and protection. In rare cases, the Lord of the Forest may also transform their allies to transport them across great distances, but such a journey can be unsettling and have lasting impacts.
Roaming the planes Any single Lord of the Forest will usually protect forests across worlds, travelling between them when there is need. They will usually bring favored animals with them, or if they have transformed an opponent, they will bring them to another world, stranding them away from the forests where they will not be able to cause harm.
Implacable Hunters While the Actaeons are generally kind, and benevolent creatures, they love to hunt. When they mark their prey, they will run it to ground over any distance. Actaeons only hunt when hungry or seeking vengeance against a tresspaser who has despoiled the wilderness they protect.
When I was looking for a powerful enemy to supplement the goblins that are touched by the Black Wind (a malign, otherworldly force heavily inspired by The Black Wind from the Wheel of Time series by Robert Jordan), Thouls seemed like a natural fit. As usual, you can find a copy of this on the Homebrewery, or download a PDF!
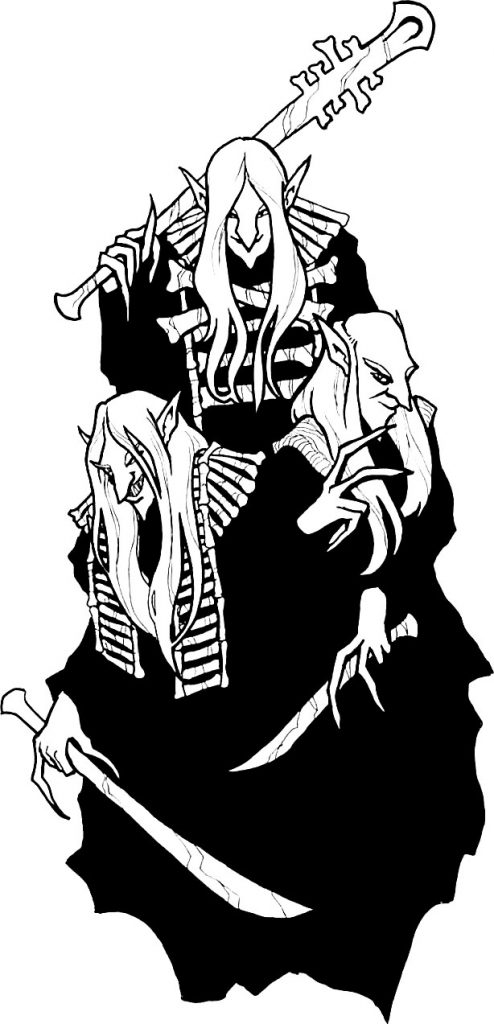
Thouls are a foul mystical blending of hobgoblins with trolls and ghouls, originally from the Mystara campaign setting from TSR. Whatever mystical grafting processing was used to combine them left Thouls as living, but necrotic creatures whose foul touch is poisonous to all living things. Stinking of decay, and having the pallour of death, Thouls appear to be grey skinned, grey haired hobgoblins with long fingers that taper into wicked claws. While the first thouls were created by mystical means, they breed naturally with other goblinoids, with only a fraction of the offspring resulting in a thoul.
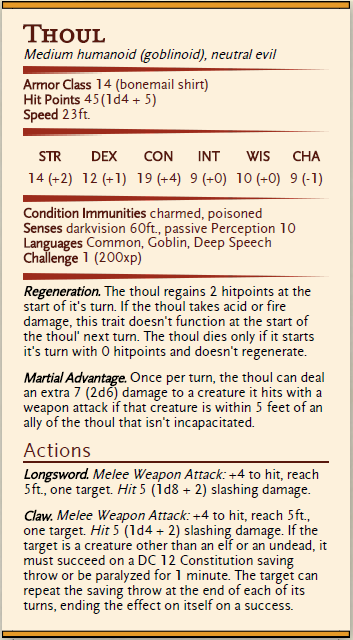
Shock troops. Thouls often form the front line of a goblinoid force – their poisonous touch can disable their adversaries, and their healing abilities make them more resilient than their allies.
Scavengers and Outcasts. Thouls don’t usually mix socially with other goblinoids – outside of a warband, or the few shamans and warlocks that set themselves apart from common thouls, they are very unpopular, reminding others of the hideous experimentation that other races often perform on goblin-kind.
Chosen of Elder Evils. While goblinoids are not usually the first choice when seeking minions, some thouls are smarter, wiser, or stronger then their kin, and this makes them attractive to gain a fast foothold in an area. Shamans and Warlocks that swear themselves to dark powers often rise to positions of power commanding warbands and tribes.
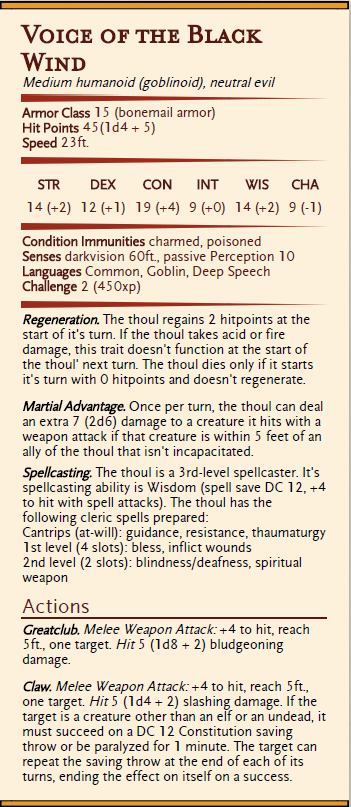
Several tribes of goblinoids have been taken over by the Cult of the Black Wind, and of them, several thouls have been taught by the Seers to act as shamans. These Voices of the Black Wind answer to The Faceless and the Seers, and often lead warbands. The Voices of the Black Wind usually wear bonemail armor crafted from the remains of victims of the Black Wind.
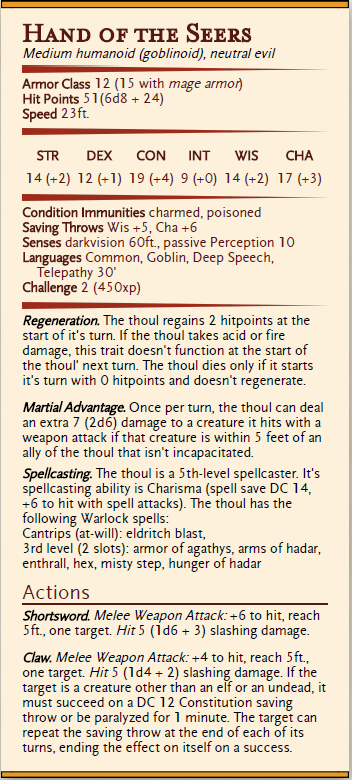
Some of the thouls who are even more capable than those who are raised as shamans are offered the chance to trade their souls for more power, and become warlocks dedicated to the Black Wind. Lured by the false promise of the chance to become seers themselves, they give up aspects of themselves to become Hands of the Seers with the knowledge that, like all who serve the Black Wind, those who fail will be flayed and transformed into the Faceless.
The Servants of the Black wind can often be found wearing armour made from the bones of sacrifices to the Black Wind. Bonemail Armour comes in two varieties – bonemail shirts, and bonemail armour. Regardless of the type of armour, all bonemail grants disadvantage and diplomacy checks, but advantage on intimidation checks against intelligent, living creatures due to the hideous sound and visage the armour grants.
| Amour | Cost | Armor Class | Weight |
| Bonemail Shirt | 75 gp | 13 + Dex modifier | 15 lb |
| Bonemail Armour | 100 gp | 15 + Dex modifier | 25 l b |
This is the first of a 3 part series on building a local multiplayer arena game in Unity using Physics2D and Cinemachine. The first part will walk through creating the core mechanics of the game, including creating pirate ships, shooting cannons, and destroying ships. The second part will cover creating the core game loop, and the third will add User Interface elements and audio.
Once I have posted all three of the tutorial parts, I will record and put up a video illustrating the tutorial step by step on Youtube!
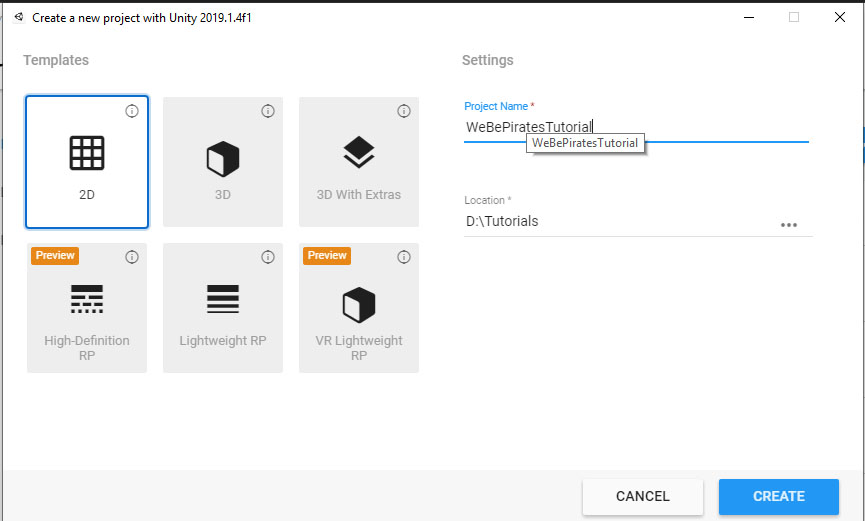
This tutorial assumes basic knowledge of using the Unity editor – you need to know how to import assets, create a scene, and should be familiar with the absolute basics. If you don’t have Unity installed, check out this video for a quick tutorial to get started.
The tutorial uses free resources from the following:
I recommend supporting the artists that are doing awesome work creating music and art for us to use in your games (or else this would all have been done with in mspaint and sound recorder!). You can download the bundled assets here.
Finally, if you need a copy of the completed code (for example, if you weren’t able to complete one of the steps, or ran into any issues), you can download the completed code for part one of the project here.
So lets get to it!
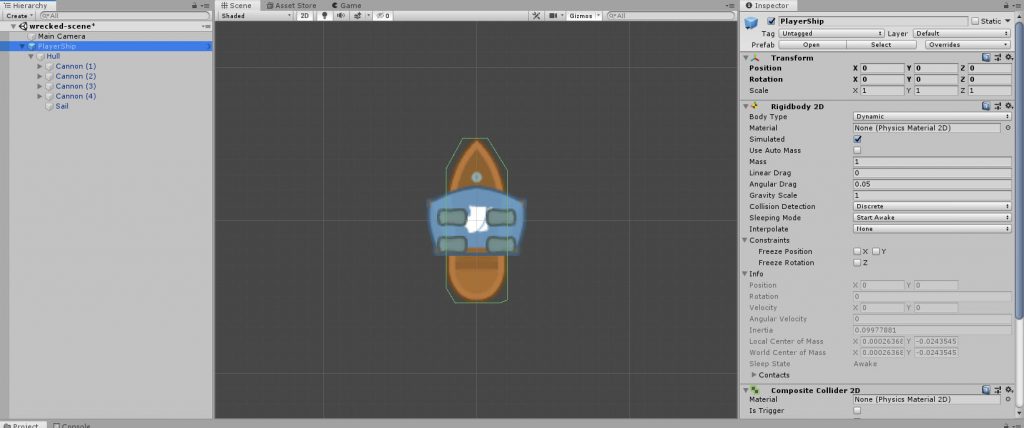
The first step is to create a ship that we can sail around and shoot cannonballs, and to do that we need to start with a fresh scene. We are going to start with creating a ship with different components,
A couple of notes about what we have done here – we have created two separate sprites that are children of a GameObject, added a couple of colliders to make sure that we have collision detection in the game engine, and added a RigidBody2D component to enable 2D physics for the game object. Just this step has unlocked a significant amount of functionality, including the ability to easily change the sprites for the hull and sails (important for showing damage to the hull, and for swapping the sails for the correct color for each player).

At this point we are ready to start writing some code! Open up the ShipController script, and lets get started!
The ship will use Physics2D, and we will move the ship around by adjusting the Rigidbody2D component. At the top of the class definition, and add the following code:
     // Cached Rigidbody2D reference
     Rigidbody2D rb;
     [Header("Input")]
     // Input Map
     public string HorizontalInput = "Horizontal";
     public string VerticalInput = "Vertical";
     public string FireCannonsButton = "Fire1";
     public bool ControlsEnabled = true;
     [Header("Movement")]
     // Movement Variables
     public float shipSpeed = 8;
     public float shipTurnSpeed = 180;
     float movement;
     float turn;
Find the “Start” medthod, and change it so that it has the following code in it:
     void Start()
     {
         rb = GetComponent<Rigidbody2D>();
     }
This will look up the Rigidbody2D component we added in section 5.a above, and make it available to the script. The next step is to implement controls – go down to the “Update” method, and add a new method with the following code below:
     private void FixedUpdate()
     {
         if (ControlsEnabled)
         {
             movement = Input.GetAxis(VerticalInput);
             turn = Input.GetAxis(HorizontalInput);
         }
         else
         {
             movement = 0f;
             turn = 0f;
         }
         Vector3 delta = movement * shipSpeed * transform.up * Time.fixedDeltaTime;
         rb.MovePosition(rb.position + (Vector2)delta);
         rb.MoveRotation(rb.rotation + turn * shipTurnSpeed * Time.fixedDeltaTime * -1);
     }
Note that we have two methods with the name Update in them – the Update() method, and the FixedUpdate() method – these are named because they are called at different times. There is a great explanation of what the difference between the two are, but for our purposes it’s enough to know that since we are using the Physics system, we want to place our physics related code in the FixedUpdate(). If you want to know more, you can head over to the Unity Learning site to watch this video about it!
In the code above we first check to see if controls are enabled – if they are, we retrieve the vertical axis for forward movement, and the horizontal axis input for ship rotation – in this case we are using the Unity default controls, so the left stick on a Direct3D controller, or WASD, or the Arrows on a keyboard. If the controls aren’t enabled, we simply set the movement and turn values to 0, which will negate any movement. Then we calculate how much the ship has moved by taking the movement input and multiplying it by our ship speed, and then multiplying it into a matrix for 2D movement we use transform.up, which is a Vector2 that specifies (0,1), or movement in the Y axis. We then multiply this by the Time.fixedDeltaTime value so that we slice up ship movement so we don’t try to move the whole ship speed in a single physics update. Finally we use the Rigidbody2D object that we got earlier to update the position by adding the delta to the current position.
The next line does a similar thing for ship rotation by taking the turn input, multiplying it by the turn speed, and multiplying that by the fixed time interval, again to tie ship rotation to the physics update – note that we multiply the rotation by -1, this just reverses the direction of the rotation, and makes sense for our control scheme. We then use the MoveRotation method to rotate the ship by the turn amount.
There is an important point here – because we are using Rigidbody2D and leveraging the Unity Physics2D system, we shouldn’t just move the game object by updating it’s transform, that is why we are using the MoveRotation and MovePosition methods – these update the physics model.
At this point, save your script, and save your scene. Press the “Play” button, and move your ship around! If something doesn’t work, review each of the sections of code to make sure you entered them correctly, and take a look at the completed code from the zip at the top of this page. Finally, if you get really stuck, post a question here, or on the EastVanGameJam web page!
Great! One odd thing – the ship slowly drifts down to the bottom of the screen! That’s because we haven’t configured the Physics engine yet! Each Unity Project has a wide range of settings, and in this tutorial we will configure both Physics, and Input. Go to the “Edit” menu and select “Project Settings”, then click on “Physics 2D” – you will see a bunch of physics options that can be tweaked – the Unity documentation covers each one, but we are only concerned with the Gravity option – we want to change the Y value to “0”. This is a top down game, and we don’t need gravity for that.
Click play again, and you should see that the ship isn’t drifting anymore!
Create a new folder in the project pane called Prefabs, then drag the “PlayerShip” object to the prefabs folder to create a prefab. Prefabs are objects that can be easily instantiated from code, duplicated, configured, etc. The Unity manual on prefabs has more information, including the new prefab editing mode, so as usual you can find more information on the Unity site! Save your scene, and project.
Lets create a cannon ball! But before we do, one quick note… you will things like “In the Transform object, Set the position to {0, 3, 0} – if you see that it relates to a field in Unity that takes multiple values. In this case you would look for the Transform object in the Inspector, and see the row that says position, and enter the values in the order provided there.

Now we are ready to write the CannonballController code! There are a few simple things we want to accomplish – first, we want the cannonball to travel at a certain speed, and the cannonball to disappear after a certain distance. Because this game is using physics, we will use the Rigidbody2D again.
Open the Cannonball controller script, and add the following code at the top of the class:
    public float speed = 10f;
    public float range = 1f;
    Rigidbody2D rb;
Delete the “Update” method, and update the class to include the following code:
void Start()
    {
        rb = GetComponent<Rigidbody2D>();
        Destroy(gameObject, Range);
    }

    // Update is called once per frame
    void FixedUpdate()
    {
        Vector3 delta = transform.up * Speed * Time.fixedDeltaTime;
        rb.MovePosition(rb.position + (Vector2) delta);
    }
The code in the start method does two things, again, it gets access to the Rigidbody2D component to update physics, and second, it schedules the destruction of the game object. The Destroy() function allows you to clean up a gameobject, and also allows you to pass a time parameter. If we were going to be fancy, we could actually calculate the range of the cannonball, but for simplicity we will simply say that the cannonball will fly for Range seconds, then be destroyed. The FixedUpdate function works much the same as the ship controller, but doesn’t take any input. Save your scene, and press play, and you should see your cannonball fly and knock the ship offscreen! Keep an eye on the hierarchy pane – you will see the cannonball vanish after a second.
This code also contains one of our first game balance decisions – ships have a movement of 8, and cannonballs have a movement of 10 – that means that ships can’t outrun cannons, but that might not actually be the value we use in the end. By configuring them as variables we can adjust these things through the development lifecyle and see how the game plays.
Lets jump back into the code, and add support for hitting things… underneath the FixedUpdate method, add the following code:
void OnCollisionEnter2D(Collision2D collision)
    {
        Destroy(gameObject);
    }
At some point we will want to add sound, and explosion graphics. We will also want to make the ship take damage, but first we need to get the ship firing.
Select the Cannonball object in the hierarchy and drag it into the prefabs folder. Once that is done, delete the cannonball prefab, and the player ship from the scene.
The next step is to add Cannons to the ship. One cannon isn’t enough for a ship – lets go with four!
Double click on the prefab called “PlayerShip”, this will open it up in the Prefab Mode, which is a sort of sub-scene in Unity. We are going to add Cannons to the ship, which will take several steps.
Oh no! that doesn’t look good at all! The cannons can be seen over the sail! Lets set some sprite sorting orders.
In the Scene pane, click on “Scenes” beside “PlayerShip” and you will be returned to your scene. Drag the PlayerShip prefab back into the hierarchy, reset it’s transform and save your scene.
Now that we have added Cannons, we need to make them shoot! So lets take a moment and make some game balance decisions – do we want to allow Auto-fire? How fast do we want to let the player shoot their cannons? I am going to say no to autofire, I want the players to do more than just steer around blasting away, and lets say it takes the crew two seconds to reload.
Lets pop open the ShipController script again and add some code.
First, find the Header(“Movement”) line and add the following code beneath that section:
    // Simple Fire Control System
    [Header("Fire Control")]
    // when the last time the ship fired
    float NextFire;
    public float FireDelay = 2f;
    public Transform CannonballPrefab;
    public Transform[] GunPorts;
The NextFire is used to determine when the next time the ship can fire is, and FireDelay is the amount of time the player has to wait to fire again after firing their cannons. The CannonballPrefab variable will provide a reference to the Cannonballs we will shoot, and the Gunports array will track where the cannonballs come from.
Second, go down below the FixedUpdate method, and add the following code:
void FireCannons()
    {
        if (Time.time > NextFire)
        {
            foreach (Transform port in GunPorts)
            {
                Instantiate(CannonballPrefab, port.position, port.rotation, null);

            }
            NextFire = Time.time + FireDelay;
        }
    }
This code does a couple of really useful things: it checks to see if the current time is greater than the time allowed to fire – if the player hasn’t fired yet, NextFire will be 0, so it will always be later. If the time is greater, then it runs through the array of gunport Transforms that we declared and creates a Cannonball at each location using the Instantiate() method. Then, we update NextFire to be FireDelay seconds in the future.
Now that we have a way to fire our Cannons, we need to actually call that. Lets go back up to the FixedUpdate() function, and find the If (ControlsEnabled) block. Update it so that it looks like this ( you only need to add the highlighted lines, don’t change anything else!):
      if (ControlsEnabled)
        {
            movement = Input.GetAxis(VerticalInput);
            turn = Input.GetAxis(HorizontalInput);

            if (Input.GetButtonDown(FireCannonsButton))
            {
                FireCannons();
            }
        }
Save your script, and switch back to the Scene. Double click the “PlayerShip” prefab to enter prefab mode, and make the following changes:
Save your scene. Press play, and then sail your ship around and press the Fire1 button (Left Control, Right mouse button, or the joystick button).
Don’t forget to save your scene. Make it a habit – it will save sadness and tears and googling how to attach a debugger to Unity to step in and break out of looks after you realize you hadn’t saved your scene after hours of work. Trust me, it’s good habit to get into 😀
Now we need to add another ship to shoot at! This is where we will learn the power of prefabs…
Now we need to configure up the Input for the game. Go into Edit, then Project Settings, then select the Input line in the left pane. This is the input configuration for Unity. If it’s not expanded, click on the triangle besides Axes to expand it.
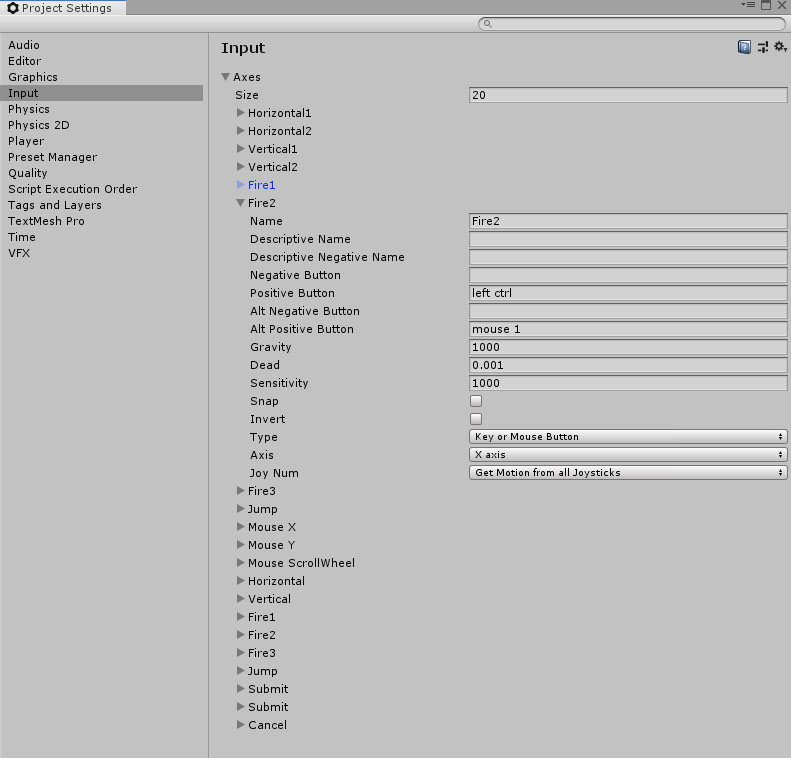
If this doesn’t work out for you, you can simply download this InputManager.asset file, and place it in the ProjectSettings directory for your Unity project. This will overwrite the settings with my copy of the file, and should get you working. If you don’t know where to find that, refer back to the path you set for your project when you created, in my example image at the beginning, I would put this file in D:\Tutorials\WeBePiratesTutorial\ProjectSettings
Close the Project Settings window, save your scene, and run your game. At this point, your WASD, and Left controls should work for one ship, and the Arrows and Right controls should work for the other ship.
Once you have the ships working properly, Drag each of the Player1Ship and Player2Ship objects into the prefab folder, and make sure you specify they are PrefabVariants. This allows them to remain rooted to the PlayerShip prefab.
The next step is to get the ships taking damage when they get hit!
In the game we want the ships be able to take a number of hits before they are destroyed – so lets give each ship a pool of hitpoints. Back to the game balance — I think it’s fair to say that each ship needs to be hit by 10 cannonballs to be destroyed. So lets say 100 hit points, and 10 damage. In reality, that is only 5 shots if a skilled player can score a hit with two cannons at the same time.
Lets start by making Cannonballs have a property that says how much damage they do. Click on the Cannonball prefab (not double click). Then click Add Component to add a new Script called “DamageSource”. Then open the script in your editor.
Delete the Update and Start methods, and then edit the file so it looks like this:
public class DamageSource : MonoBehaviour
{
    public float DamageAmount = 10;
}
Save the script, and then open the ShipController script.
Under the Fire Control section, add the following code:
    [Header("Health System")]
    public float health = 100;
    bool isDead = false;
Then, lets add a function that we can call when we should take damage to make sure that we update Health, and check for all of the things related to taking damage.
void TakeDamage(float damage)
    {
        health = health - damage;
        if (health <= 0)
        {
            isDead = true;
        }
    }
Now we need to actually do something to make sure that when we are dead, the ship doesn’t stick around! After the TakeDamage method, lets add the following two functions.
    void Die()
    {
        // Do death stuff..
        Destroy(gameObject, 1f);
    }

    void Update()
    {
        if (isDead)
            Die();
    }
This does two things, one – it allows us to have a single place to add death related stuff – the Die function (we might want to play a sound, do an animation, etc), as well as destroying the ship. We also add the Update function, which is a regular, non-physics update that simply checks if our isDead variable is set, and if so, it invokes Die().
Now – press play, pick a ship, sail it over to your enemy and DESTROY THEM!
This is the conclusion of the first part of the tutorial – in the next section we will build the game loops and start in on the user interface elements to support player selection, and part 3 will conclude with fleshing out the user interface and adding Audio.
If at any point you need to compare where you are with the actual source code for this portion of the tutorial, you can find the completed code for this section in the downloads at the top of this page! If you enjoyed working through this tutorial, consider participating in the EastVanGameJam on August 16th to 19th! Register for the GameJam here!
Thanks for taking a look at our second update to the fundraiser!  If you can, please visit the GoFundMe page to share it on social media, or make a donation if you can!

A special shout out to the folks who have donated since the fundraiser started:
Allison Waithe, Joshua Bixby, and the other 3 anonymous donors!  Thank you for your generous donations!
Last week I reached out to a few folks to find out if there was interest in distributing respiration masks to folks in Vancouver, and there was, so this week I sourced some low-cost respirator masks, decided on a funding platform, and launched a GoFundMe campaign to raise money. I have posted on the social media platforms I used, bugged coworkers, friends, and colleagues, and we are now over 50% of the way to our initial $1,000 goal!
Along the way I have spoken to a few other organizations that will help out with distributing the masks we get, but I have also learned a fair bit more about the effectiveness and limitations of the types of disposable masks we aim to hand out. One of the folks I have been discussing this plan with also shared Preparing for Extreme Heat and Poor Air Quality Events, an information seminar on how BC and Vancouver are preparing for this years, and future extreme weather events. The video is below, but the link to the BCNPHA above has more details about who and what the session entails.
The whole video is exceptionally informative, and worth watching, especially if you work with people who are at risk, and to know what resources are available in your neighbourhood. The information in this session was so valuable that it has resulted in a material change to how we will distribute the masks, and there will be more information on that later in this post! In the Question and Answer session at the end, the question came up around the effectiveness of respirator masks, and Dr. Sarah Henderson from the BC Centre for Disease control provided some great guidance on the effectiveness of masks. Overall, the simple question about masks made me question the value and efficacy of donating these masks, and so I reached out to Dr. Henderson for some more information, and she took the time to have a very informative discussion with me. Based on that discussion, I have a few key take-aways to make sure the distribution of these masks is a net positive for protecting at-risk and homeless folks.
A key point that Dr. Henderson raises is that using a mask may present a false sense of security and encourage folks who are wearing one to do things they might not otherwise do – the example she uses is wearing a mask and going for a jog, when the same person might choose to jog indoors on a treadmill instead. Dr. Henderson also discussed in brief the protection that an N95 mask provides – protection against particulate matter, but not gases and volatile organics. This one hits close to home as folks with asthma are often more susceptible to the effects of those gases.
Over and above the risks that masks can’t protect against, the masks themselves may introduce a risk – worn properly they make breathing more difficult and could prove more of a hindrance to people with respiratory problems than the actual smoke the mask would protect against.
Dr. Henderson (and really, all of the awesome folks involved in the seminar) drive home that the first line of defense are making sure that people have access to cool environments, clean air, and water as a way to cope with extreme weather events. At no point in all of the efforts that the City of Vancouver, BC Housing, and the BC CDC discussed in the session were masks raised – it was brought up in question at the end of the session from one of the delegates! Overall, this portion of the Q&A period made me question the value and efficacy of donating these masks. Based on discussions with other folks in community outreach, the focus on distributing these masks is to folks who are at-risk, and those poepolmay not have access to shelter or indoor locations with clean air. In order to make sure these donations are effective, I am revising the goal to providing the masks with the information at-risks folks need to able to get to and use first-line defenses discussed in the session above.
Both Dr. Henderson and Dr. Schwandt talk about the effectiveness of using masks, and there are a couple of items that came up. First – for masks to be effective, they have to be N95 masks, regular dust masks, surgical masks, and clothing carry all of the negatives of wearing a mask without any of the benefits. Second, once you have an N95 mask, the key variable is fit. The masks are only effective if they are worn properly, and for that to happen they have to fit correctly, and this varies with face shape, size, and features such as facial hair, etc. In order to make sure distribution of masks, we are going to get at least three different types of masks. In addition, we have reached out to the folks who are going to help distribute the masks to figure out how to deliver training on helping the recipients to effectively wear the masks for good fit.
A repeated refrain for all extreme weather conditions is that staying indoors is the best way to protect yourself from wildfire smoke, and this year the City of Vancouver is expanding on the availability of Cooling centres and water fountains by also providing Clean Air centres that will feature locations that have air filters deployed to make sure folks who need to have a place with clean air they can go to. In order to make sure that mask recipients are aware of this, each mask will include an card with more information. So far the goal is to include:
Practically speaking? Not much! I set out with the initial goal of raising $1,000 to provide masks for homeless people, with the goal of providing 1000 masks. The good news is that based on the estimated cost of getting the cards printed is approximately $150 from the first two estimates I got. Ideally, I should be able to find better pricing on the printing. The good news is that I have been able to find reasonable pricing for masks, and even though we are ordering 3 different types of masks, we should be able to find volume savings that that allow us to bring the cost for the masks low enough to cover the cost of printing the cards. At the absolute worst case scenario, we will provide approximately 850 kits rather than the goal of 1000, but
The goal is to have the design work for the information cards done this weekend, and to work with the community outreach groups distributing the kits (since it’s more than a mask now) to make sure that they have awareness of the issues with using the masks.
Our next update will probably be on Monday!
Thanks for checking out my brand new blog, I will be incorporating content from previous versions of my blog soon, but this post was more important and has a call to action - if you can, please donate to my GoFundMe campaign to get respirator masks to at-risk folks before we have more days with poor air quality.
Thanks!
Yvan Boily
As a person who suffers from Asthma, I have been to the emergency room several times due to air quality, so this summer Monique and I decided we were going to get respiration masks for the four of us. As I was looking at them I realized that four masks at $40 each is a small price to pay to make sure we can breath for a few weeks a year, but it’s unachievable for alot of people who are living with the affordability crisis in Vancouver. There are cheaper, disposable options, but even those can be too expensive or not enough of a priority for at-risk and homeless folks.
Inspired by posts like this one I decided that I wanted to make sure that homeless and at-risk folks have access to masks in my community. Every bit counts, but when I looked at how much I could personally commit to this, and the cost of buying masks, I realized that there had to be a better way to help out. Having seen so many crowdfunding campaigns, and buying products through them on Kickstarter and other platforms, and donating to several over the years, I decided to explore the different platforms and run a campaign to raise money. While researching this, I realized it wasn’t enough to get money to buy a large volume of masks, there are logistical challenges to getting them to a large number of at-risk folks, and especially making sure that the folks who need them can get them each day that they need them. I could hand out a few masks, but getting them to people consistently isn’t something I can do myself. I reached out to homeless shelters, and to neighborhood outreach groups, and started to build a small network of people who can help to distribute them – it turns out there is a recognized need for this, with just one group expressing a need for 200 masks to help the folks they will work with over the summer.
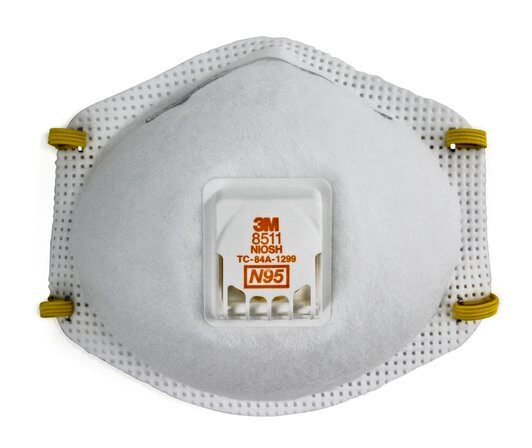
I did some research and found a bunch of options for acquiring low cost, single use, vented respirators, and depending on volume can get the price down to as low as $1.10 (the price goes lower, but that’s at the 10K plus units). I settled on the 3M 8511 N95 masks, but may choose a comparable product based on funds raised, and community needs to make sure we help as many people as possible.
While the idea of buying a pile of single use, mostly synthetic disposable products is not ideal for the environment, they make sense for the folks who will receive them:
Now that I have a way to distribute them, and the means to get the product I need your help – I decided to use GoFundMe as a platform to raise the funds I need to help these people. GoFundMe allows me to withdraw money over the course of the fundraiser rather than a Kickstarter style approach that only allows us to get the money if the campaign is succesful. As of this morning we have raised over $200, which means that the first masks will be ordered in the next couple of days! c, but if you can’t donate there are other ways you can help:
Finally, this campaign will be running through the whole summer, and to make sure that these funds go to good use, any extra funds at the end of the campaign will be distributed to the charitable organizations that help out with mask distribution – I will be posting regular updates on the GoFundMe page to provide more information about who these are on that site once we get the masks out to folks!
Thank you so much for your time and effort in helping to promote and raise awareness of this cause!
Heartbleed Cheatsheet:
If your employer won’t let you do these four things, the next thing to do is find a new job.
Anything less would be unprofessional.
Since Jim asked, this cheat sheet is licensed under the Mozilla Public License, and I will happily license it under other suitable licenses if needed
I gave a talk on November 17th at BSideWinnipeg called Security In the Open. It was really fun to head back to Winnipeg for a beautiful November weekend, and catch up with some of my former colleagues!
Update: You can watch the talk on Youtube below:
I gave a talk at AppSecEU 2013 on August 23rd about Minion, and talked about some of the things we are doing to make the security testing more available to the Mozilla community.
Update: You can watch the recording below:
I gave a talk at RMLL on July 6th on the structure and organization of the security team at Mozilla, and how we built and supported the security of websites and services across the community.
The talk can be viewed via the RMLL site, or below!